The upper right corner
of the window displays your user
name, the database you've
logged into, the accounting
cycle in which you're working, and the link to logout
of the program.

After you login to AptaFund, you'll see the home window, otherwise known as your dashboard.
The upper right corner
of the window displays your user
name, the database you've
logged into, the accounting
cycle in which you're working, and the link to logout
of the program.

My Reports: You can create a list of favorite reports that will be displayed on the left side of your dashboard. Click here for instructions.
Quick links are displayed on the left side of the dashboard and include Change My Location, New Leave Request, My Paychecks, My Leave Requests, My Leave Balances, My Leave Approvals (if you're an approver), My Year-to-Date Totals, My Documents, W-2 Forms and My W-2 Consent Elections.
Help: This section includes links to open the online User Guide, create a new AptaFund support ticket (opens a form to email Support), access the AptaFund support website, and submit an idea to AptaFund staff.
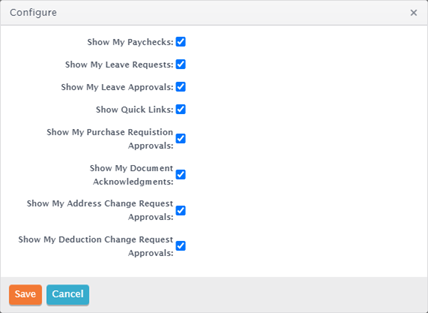
You can choose whether or not to display the quick links and grids on your dashboard. The grids give you quick access to popular items and items needing your attention.
Options available to all users: Show My Paychecks, Show My Leave Requests, Show Quick Links, Show My Document Acknowledgments
Options available only to approvers: Show My Leave Approvals, Show My Purchase Requisition Approvals, Show My Reimbursement Approvals, Show My Address Change Request Approvals, Show My Deduction Change Request Approvals
Click the Configure button at the bottom left
side of the window to open the Configure window.

Check/uncheck the
boxes to include/exclude the sections you want, and click Save.
You'll be returned to the dashboard with your selected options displayed.
Note: You won't see the Show
My Purchase Requisition Approvals checkbox in this window unless you're
an Approver.
Click here for descriptions of, and instructions for, using the Employee Self Service Quick Links and grids.
The menus for the modules are
arranged across the window just below the AptaFund logo. You may not see
all the options displayed below because you will only see modules in which
you have permission to work.

Menus that contain more than is named in the menu bar are described below.
The My AptaFund menu contains the commands that apply to you specifically — e.g. change password, my leave requests, etc. — as well as links to the online help for AptaFund, reports, and exports.
The Purchasing & Payables menu includes purchasing, accounts payable, vendor, and capital assets.
The Accounts Receivable menu contains commands for cash receipts, accounts receivable, and customers.
The HR, Payroll, & ESS menu also includes the Affordable Care Act and leave commands.
The Administration menu includes security, configuration, approval process, imports, and fiscal year end exports,
Return to Navigation Overview