Select Bill Schedules from the Accounts Receivable menu, and the Bill Schedules window opens.
Check the box for the bill schedule to which you want to import items.
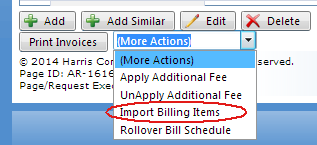
Select Import Billing Items from the More Actions pull-down menu at the bottom of the Bill Schedules window.

The Import Billing Items window opens.
Click the Choose File button, navigate to the location of your import file, and click Open. You should see the name of your file beside the Choose File button.
Click the Load File button. The data is loaded for validation before it is saved to the system. Any errors will be indicated in the Errors column for the line containing the errors. See error example.
-
If there are errors, you must correct the import file, and then click the Re-Import Excel Data button in step 1.
-
If there are no errors, continue with the next step.
Click the Import button in step 3. You'll see a message at the top of the window indicating how many items were imported, and you're given the opportunity to view the imported data.
Click the View Billing Items button in step 4. The Billing Items window opens with the new items included in the list.
 Version
4.1 © 2018 - Harris School Solutions - All rights reserved