Some pre-defined reports — generally those that will result in a file to be submitted to a government entity — have the Report to Grid feature that generates a grid that you can use to review and edit the data before creating the export file.
Once you click the Report to Grid or Continue with Previous Editing button, the report data grid opens.
This topic describes report properties, the window's commands, validation errors, display settings, highlighted changes, and the mass update feature.
The information at the top tells you when the report was generated and who did it. It also includes the parameters used to generate the report.


Open a previously saved report by selecting it as illustrated below.
Save all edits by clicking the Save All Modifications button. Changes are not automatically saved and will be lost if you move away from this window without saving them.

You can return to the report setup window by selecting Return to Report Selection Screen from the gear menu. Remember to save your changes before leaving the grid window.
To remove your edits and start over, click Regenerate Data in the gear menu.

To add missing rows, click the Add button below the grid to open the Add Record popup.
To edit a single row, check the box for the row, and click Edit, or click the link.
To edit a few rows, check the boxes for the row, and click Edit.
To edit all rows, click Edit All to open the Edit Record popup with the ability to save the row and move to the next row.
See Mass Update feature above for information about the Mass Update command.
When finished editing the data, click Export to File to create the export file.
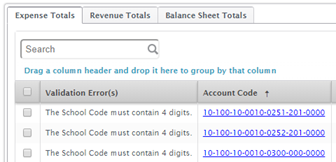
The grid opens with a Validation Errors column in the far left position. If there are errors, you will need to resolve them before generating the export.
You can make sure you see all the validation errors by clicking on the Validation Error(s) column to sort it.

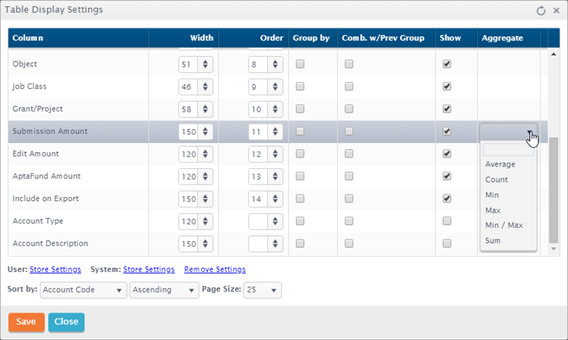
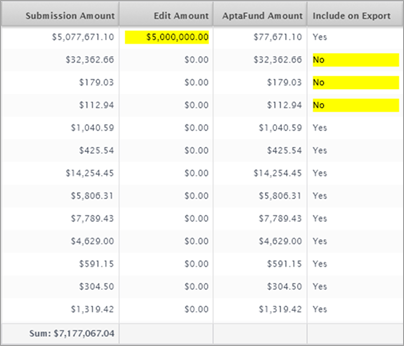
The grid may include columns that aren't displayed by default. You may display them using the Table Display Settings dialog. You can also aggregate data in columns — for example, choosing to display a sum at the bottom of a numerical column.

Any fields that have been edited through the Edit Record popup will be highlighted with yellow in the grid for easy viewing.

Use the Mass Update feature to edit multiple records that all require the same change.
Check the boxes for multiple rows, and click the Mass Update button. The Mass Update Record popup opens. Note: The fields available for mass update will vary depending on the report.
Edit the fields as needed, and click Save. The Result window opens displaying & explaining successes & failures.
Click Close
when you're done reviewing records. The results of the edits will
be highlighted in yellow.

Return to Reports Overview